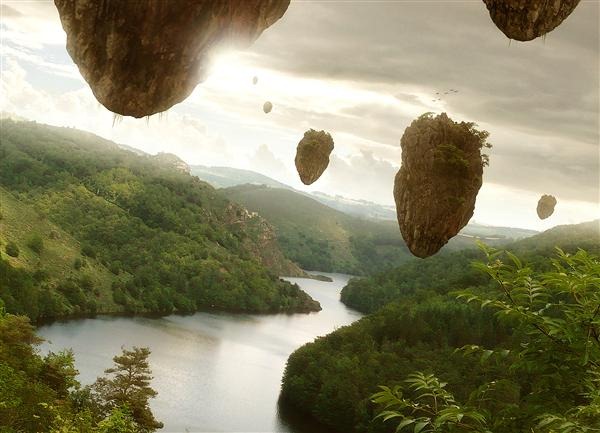
In this photo manipulation tutorial, you will learn how to create a realistic composition of a sunset in a world with floating islands! We will cover professional-level Photoshop tricks such as adding accurate shadows and highlights, various blending techniques such as giving the image a soft focus effect and altering luminosity and shadows of the scene, adding haziness, and much more!
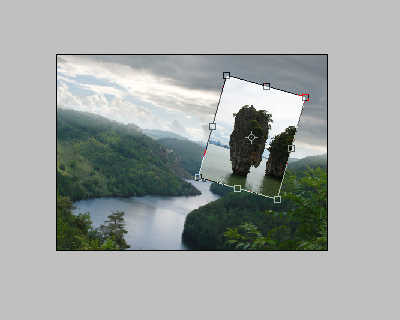
In this step, we will be adding the floating islands. Open “James Bond island 1.2” and drag it to our canvas. We would need to resize this image due to its size. Activate your Transform tool (Ctrl/Cmd + T) to resize and to rotate the image.
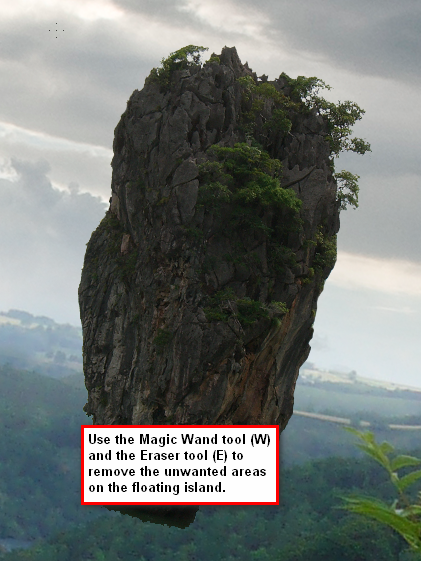
 Now that the first floating island is in place, we would need to separate it from its background. Activate your Magic Wand (W) tool and select the regions you want removed and after selecting those just press delete. Notice that the Magic Wand tool doesn’t totally remove all those unwanted areas, so we would have to erase it manually. Activate your Eraser tool (E) and erase the areas that have not been removed. For more accuracy, I suggest you increase the zoom to 400%. You can do that by going to the Navigator window and increasing the Zoom slider or the Zoom level. Erase those areas and come up with an image similar to the one below:
 Next, we will fix the shape of the island. Activate the Polygonal Lasso Tool (L) and see reference below for the area we need to remove.
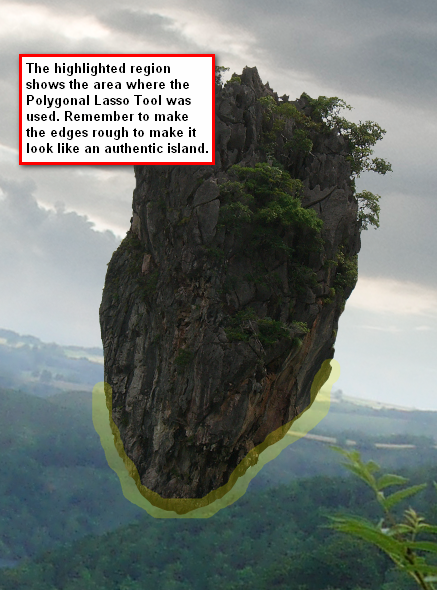 Now the image should be similar to this:
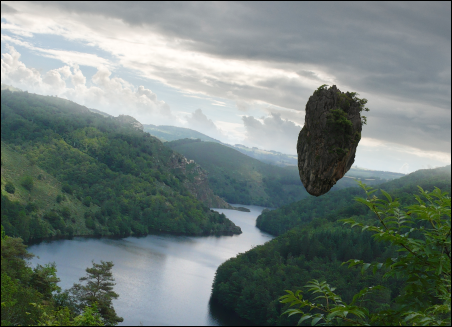 To thoroughly fix the shape of the island we would need to transform it. Activate the Transform tool and click on Warp from the contextual menu.
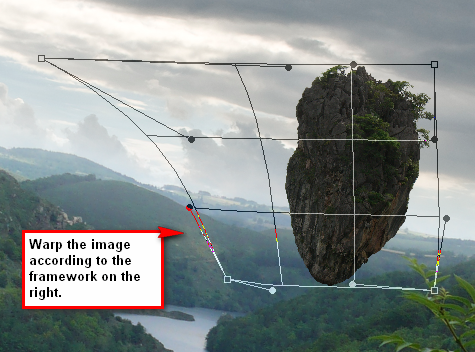 After doing that rename the layer to “island 1” and reduce its Opacity to 90% to make it blend with the background.
To make it more seamless, we would need to decrease the opacity of a small part of the island. Activate your Eraser tool (E) and use the following values:
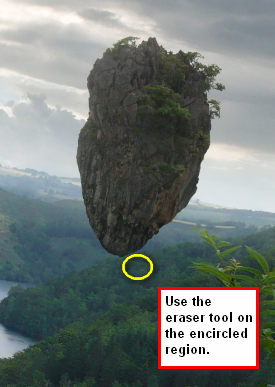 For the second island, we would need to duplicate (Ctrl/Cmd + J) “island 1” then rename the duplicated layer as “island 2”. Resize “island 2” through the Transform tool and after resizing it, flip it horizontally. We would need to flip it horizontally to give variety over the islands.
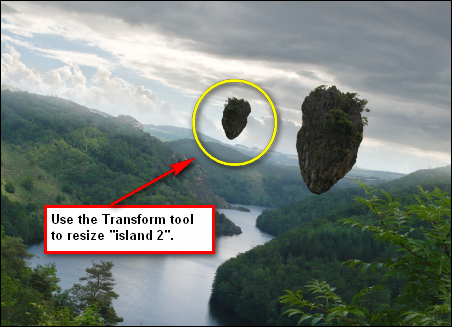 Then after that, reduce its Opacity to 80%. Now duplicate “island 2” and rename that layer “island 3”. Activate your Transform tool once again because we need to reduce its size.
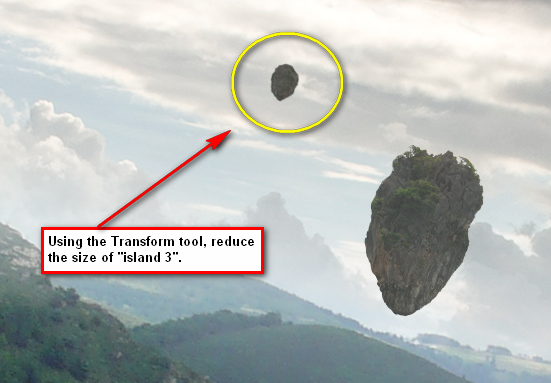 Now we would need to make this small island different from the two other islands. Activate the Eraser tool (E).
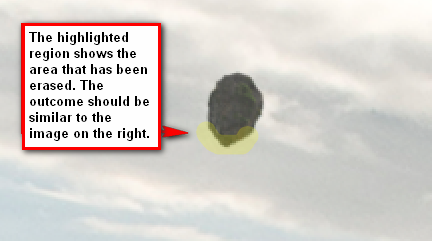 After that, reduce its Opacity to 55%. Duplicate “island 3”, rename it “island 4” and then scale it down using the Transform tool.
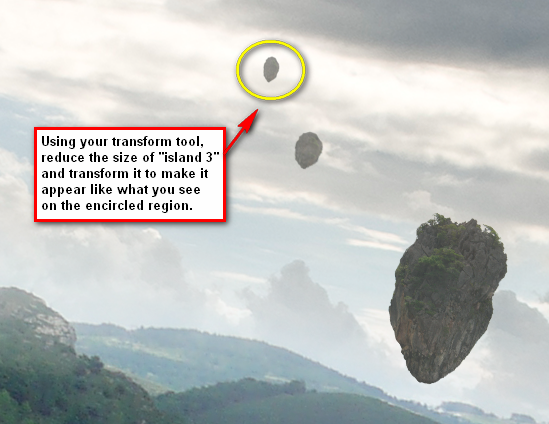 Reduce its Opacity now to 40%. Click on “island 2” and duplicate it. Rename that layer “island 5” and resize it using your transform tool.
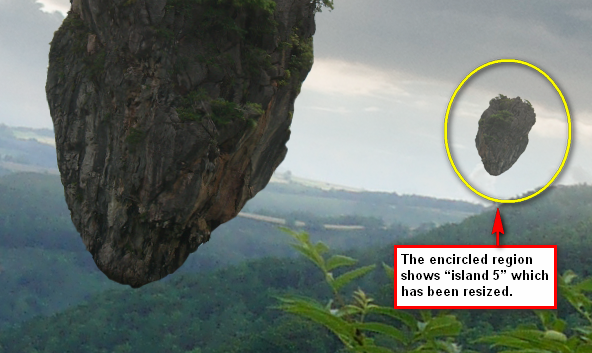 Now we would need to erase some parts of it to make this island distinctive. Now activate your Polygonal Lasso tool (L) and follow instructions on the image below:
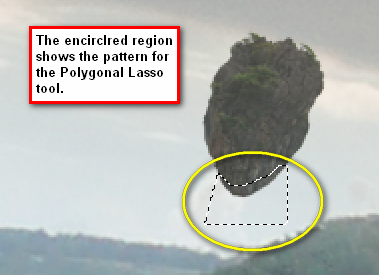 After that just press Delete to erase the region within the Polygonal Lasso tool’s selection then reduce the Opacity of “island 5” to 60%. Now let’s put the big floating island in our picture. Click on “island 1”, duplicate it, and then rename that layer as “island 6”. We want this island to appear massive because it is near the viewer so let’s increase its size using the Transform tool.
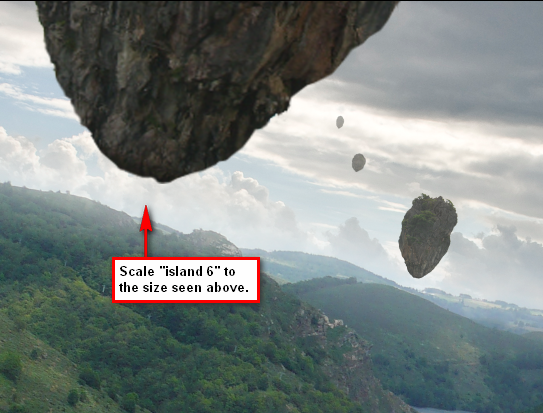
Because it has been resized to a large scale, the island now has gotten blurry. We would need to sharpen that. Click on the “island 6” layer and go to Filter > Sharpen > Sharpen. That doesn’t do much good, so we would need to sharpen it a bit more by using the Activate your Polygonal Lasso Tool (L).
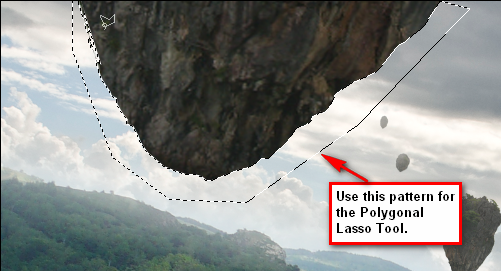 After deleting the selection, you’d notice that it now has gotten too sharp and very uneven. To fix that, let’s use the Eraser tool (E) to fix the unwanted sharpness.
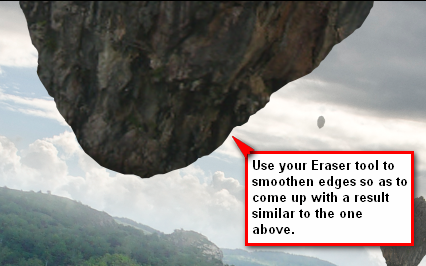 Duplicate “island 1” once again and rename this layer “island 7”. We would need to increase its size again, so activate your transform tool and scale it.
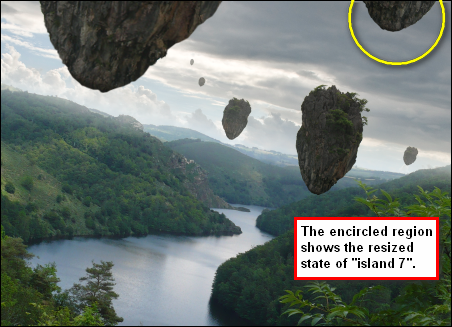
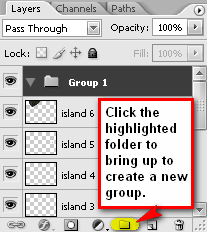
Then change its Opacity to 100%. After that, group all the island layers. Click on Layer > New > Group and it would appear on top of all the layers present in our canvas. Select all the island layers and drag them to the new Group. Rename that Group as “Islands”
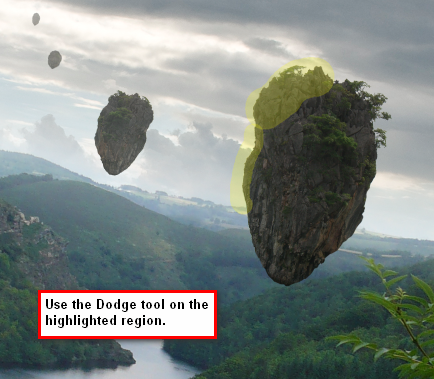
Now it is time we deal with the lights and shadows. Activate your Dodge and Burn tool (O) and click on “island 1”. (Note: To change to the Dodge tool or to the Burn too, simply left-click and hold on the respective button to bring up the menu) Activate the Dodge tool and use these values:
 We’ll also need to add in some shadows to “island 1”. Activate your Burn tool and input these values:
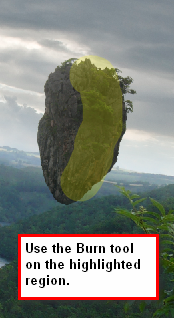 Now let’s edit the light on “island 2”. Click on that layer and use the same Dodge tool values above.
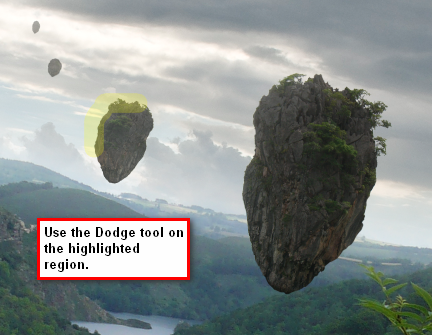 For “island 3”, use the same Dodge values.
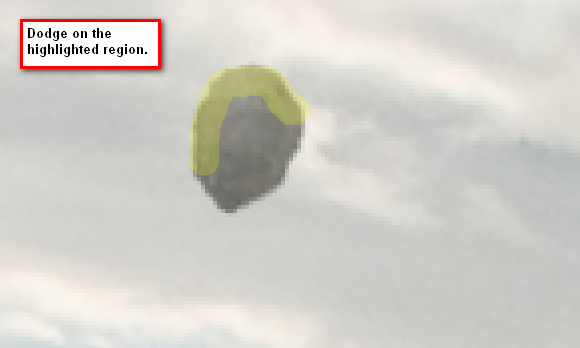 The light on the 3 islands should be similar to the image shown below.
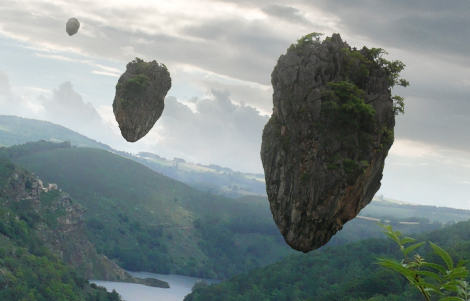 The light on “island 4 and 5” is acceptable so there is no further need to edit its light condition. Now focus on “island 6”. We will give it a hazy effect so activate your Eraser tool (E) and use the following values:
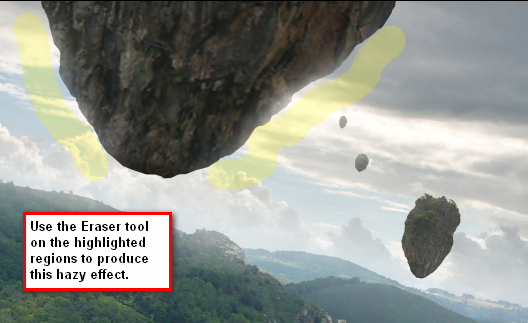 We would need to adjust the shadows of “island 6”. Create a new layer and activate your Brush tool then use these values:
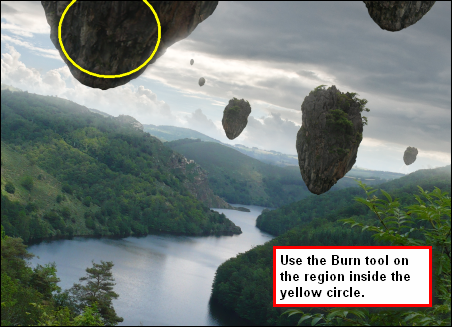
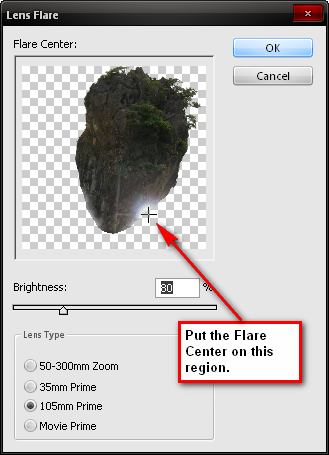
Now let’s make the light more ambient. Click on the “island 6” layer then go to Filter > Render > Lens Flare and then input these values:
 To increase that effect, create a new layer and name it “light1”. Activate your Brush tool (B) and use these values:
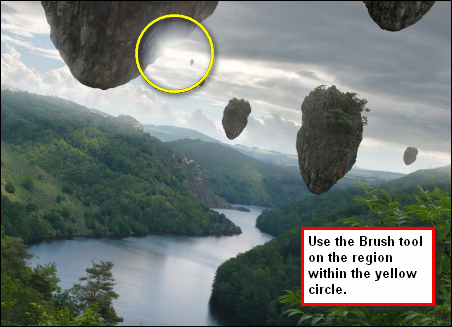
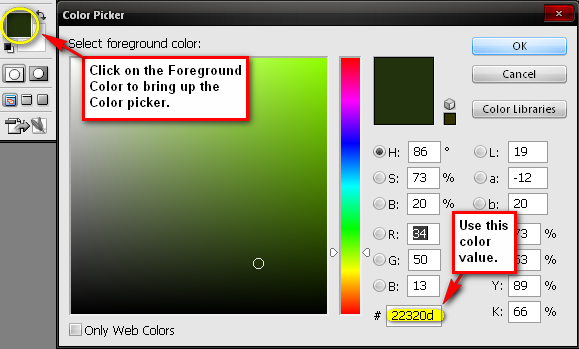
 Let’s now change its color, click on the Set foreground color and input this value on the # box:
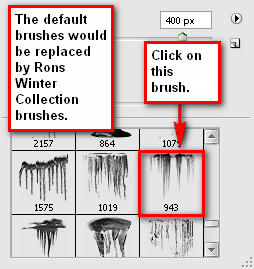
 We would be applying the roots on “island 6”. Make sure that the currently active layer is “roots 1” then set the Brush values to:
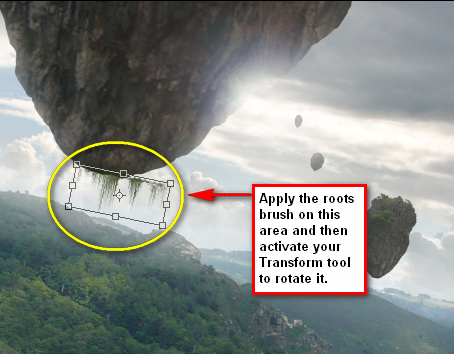 Now after transforming it, activate your Marquee tool (M). See image below for instructions.
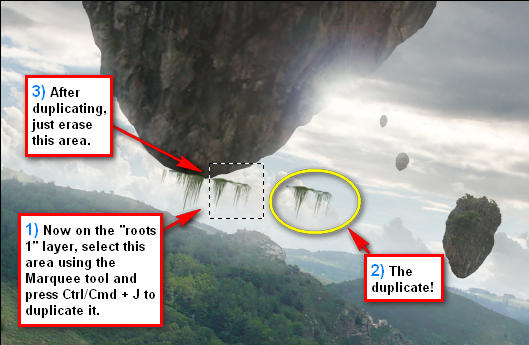 Rename the duplicated layer as “roots 2”.
Next we would have to move and erase some parts of our roots. See image below.
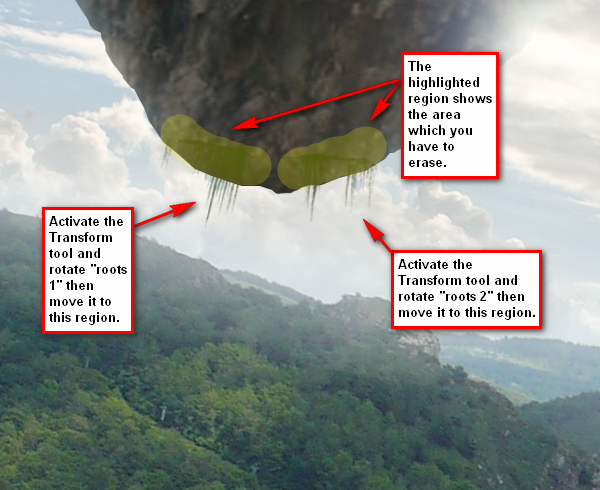 When erasing the excess, I would recommend using these Eraser tool (E) values:
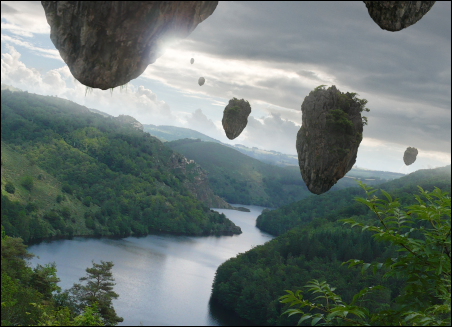 Now let’s put some roots on “island 7”. We won’t need to put any roots on the other islands for it would just be too hard to see. Select “roots 1” and “roots 2” and right click on any of those layers then when the contextual menu pops up, just click Duplicate layers and press OK then rename them as “roots 3” and “roots 4” respectively. Move those layers up to where “island 7” is located.
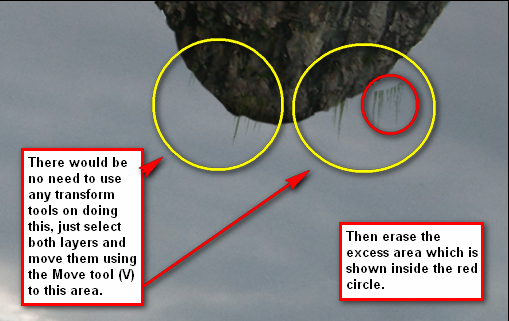 Group those layers and rename the Group as “Roots”.
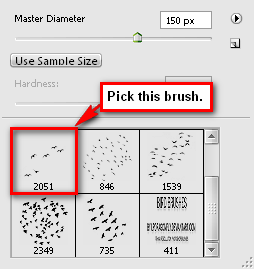 Use these brush values:
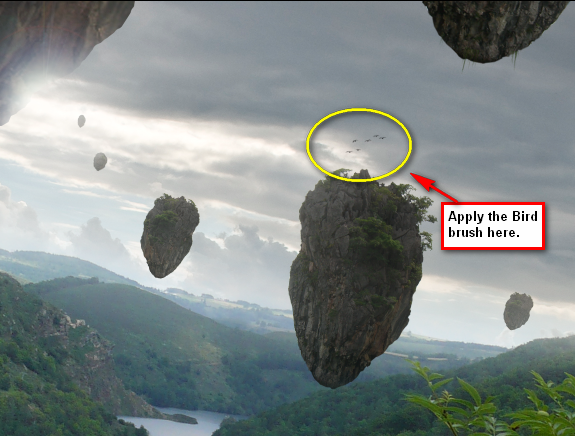
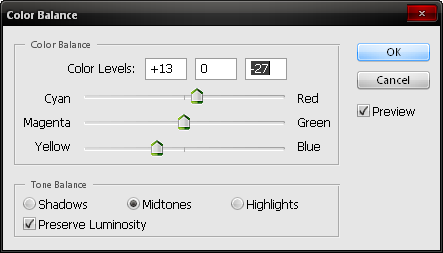
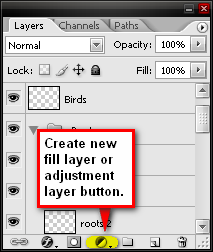 From the “Create new adjustment layer” button pick Color Balance. When the box pops up input these values respectively:
 Next, add a solid color and from the “Create new adjustment layer” click on Solid Color from the contextual menu. Input this value when the Color Picker box opens:
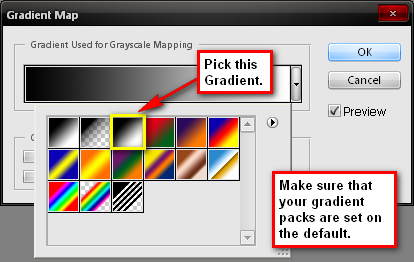 As it appears on our Layer window, change the settings to:
 Create a Brightness/Contrast adjustment layer then input these values:
Now let’s add a dreamy effect to our scenery. Right click on any layer then press Flatten Image. Then duplicate our image (Ctrl/Cmd + J). While the duplicated layer is selected, go to Filter > Blur > Gaussian Blur and input this value:
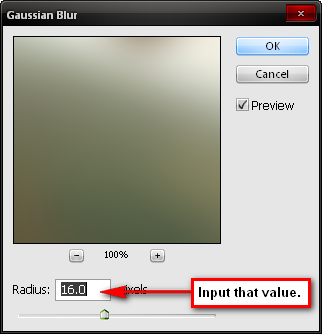 Then press OK. Now on the Layer window, use these settings:
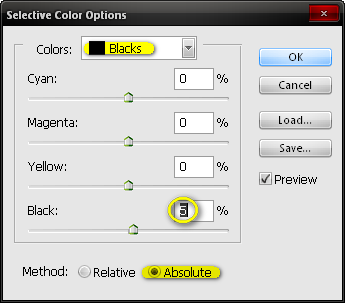
Now that that’s done, let’s Flatten the image.
Before anything else, you may want to save it as PSD file so you may edit the image again in the future. After that, let’s sharpen the image. Go to Filter > Sharpen > Smart Sharpen and input these values:
After you’ve done the sharpening, you may flatten the image by right clicking on any layer and clicking Flatten Image. You may want to save it as a TIFF file first, which would allow you to do some quick changes to the image, like adjustment layers and fill layers without reducing its quality. You can view cracks in the image through the Histogram. Finally, save it as a .jpeg image.
Note: Over edited .Jpeg files would reduce the image’s quality, especially in print.

from photoshoptutorials site

Preview of Final Results

Tutorial Resources
- River Stock 3 by cat-in-the-stock (Royalty Free License)
- James Bond Island 1.2 by meihua-stock (Royalty Free License)
- Field of dreams by cubstock (Royalty Free License)
- Rons Winter Collection (Royalty Free License)
- Bird Brushes by lpdragonfly (Creative Commons)
- Antelope Island 35 by night-fate-stock (Creative Commons)
Floating Island Scene Photoshop Tutorial
- Program: Adobe Photoshop CS2
- Difficulty: Medium
- Estimated Completion Time: 1 to 1.5 hours
Step 1 – Create a new file
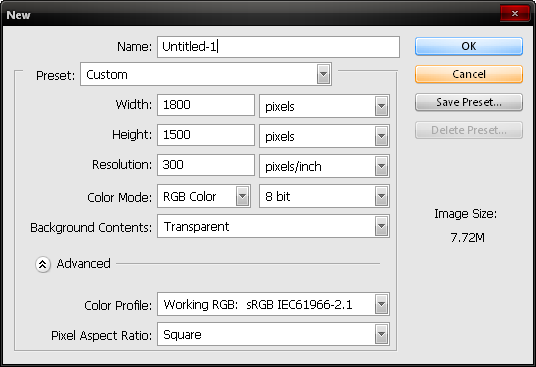
Create a new file The image that we would be creating may be used as a high-resolution desktop wallpaper thus the following settings to begin with:
- Width: 1800px
- Height: 1500px
- Resolution: 300 dpi
- Color Mode: RGB Color; 8bit
- Background Contents: Transparent

Step 2 - Create the scenery
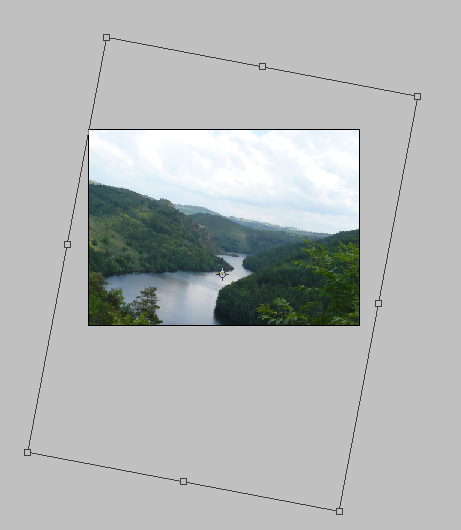
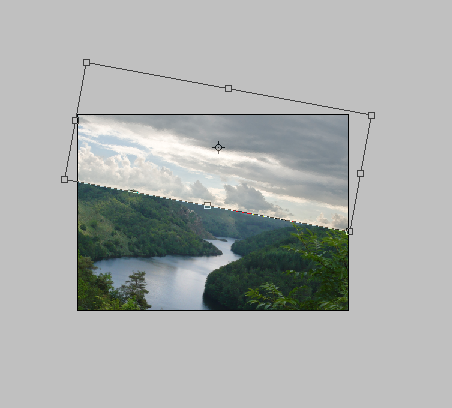
To begin, let’s open “River Stock 3”. Use your Move tool (V) and drag it to our canvas, with the image in place, activate your Transform tool by pressing Ctrl/Cmd + T and rotate the image.

The sky of our present image doesn’t look that good, so we have to change it. Open “Field of dreams”, then select its sky using the Marquee tool (M) and drag the selected region to our canvas using the Move Tool (V). Once it is on our canvas, transform the image by pressing Ctrl/Cmd + T. Flip the image horizontally once the transform menu pops up and rotate that selected sky.

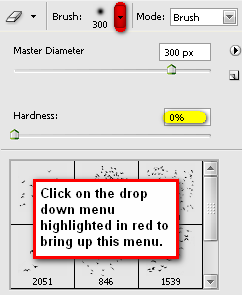
We would need to erase the unwanted parts of our sky to bring out the mountains. Activate the Eraser tool (E) and use the following option values:
- Brush size: 300px
- Hardness: 0%
- Opacity: 100%
- Flow: 100%
Note: The brush hardness can be activated by pressing the drop-down menu on the Brush size tab.

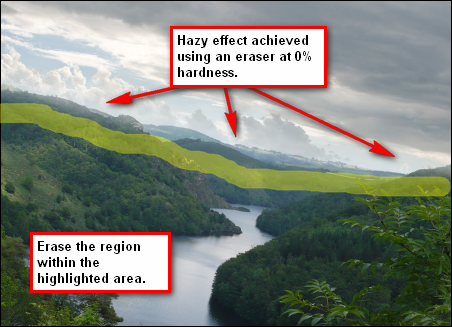
Now that you have your Eraser tool ready, we can now erase parts of the sky that covers our mountains.

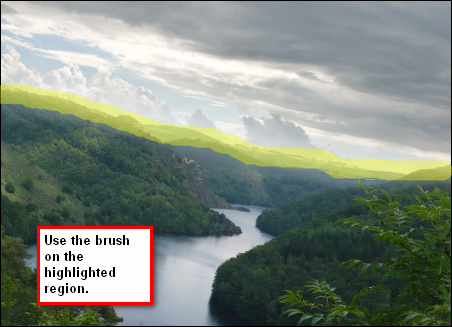
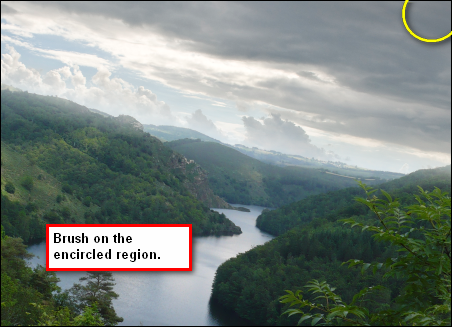
We will be increasing the hazy effect on the mountains. Create a new layer (Ctrl/Cmd + Shift + N) then name that layer “hazy”, you may rename it by double clicking on the word “layer” and typing a new name for it. Activate your Brush tool (B) and enter these values:
- Brush size: 175px
- Hardness: 0%
- Opacity: 15%
- Flow: 100%
Use the Brush Tool on the region indicated by the image below.

We would need to darken a small part of the sky to make the sky look a bit more dramatic. Create a new layer and name it “Darken” then activate your brush tool and use the same Brush values above.

Step 3 - Add the floating islands
In this step, we will be adding the floating islands. Open “James Bond island 1.2” and drag it to our canvas. We would need to resize this image due to its size. Activate your Transform tool (Ctrl/Cmd + T) to resize and to rotate the image.


To make it more seamless, we would need to decrease the opacity of a small part of the island. Activate your Eraser tool (E) and use the following values:
- Brush size: 200px
- Hardness: 0%
- Opacity: 100%
- Flow: 100%


Because it has been resized to a large scale, the island now has gotten blurry. We would need to sharpen that. Click on the “island 6” layer and go to Filter > Sharpen > Sharpen. That doesn’t do much good, so we would need to sharpen it a bit more by using the Activate your Polygonal Lasso Tool (L).


Then change its Opacity to 100%. After that, group all the island layers. Click on Layer > New > Group and it would appear on top of all the layers present in our canvas. Select all the island layers and drag them to the new Group. Rename that Group as “Islands”

Step 4 - Create the ambient light
Now it is time we deal with the lights and shadows. Activate your Dodge and Burn tool (O) and click on “island 1”. (Note: To change to the Dodge tool or to the Burn too, simply left-click and hold on the respective button to bring up the menu) Activate the Dodge tool and use these values:
- Brush: 125px
- Range: Midtones
- Exposure: 15%

- Brush: 200px
- Range: Midtones
- Exposure: 30%


- Brush size: 200px
- Hardness: 0%
- Opacity: 100%
- Flow: 100%

- Brush size: 300px
- Hardness: 0%
- Opacity: 50%
- Flow: 100%

Now let’s make the light more ambient. Click on the “island 6” layer then go to Filter > Render > Lens Flare and then input these values:
- Brightness: 80%
- Lens type: 105mm Prime

- Brush size: 400px
- Hardness: 0%
- Opacity: 100%
- Flow: 100%

Step 5 - Create the roots
To make the floating islands look like they’ve come from the ground, we would need to put some roots on the bottom of the island. Let’s create a new layer outside the “Islands” group and name that “roots 1”. Activate your Brush tool (B) and right click on the image to bring up the Brush tool menu then click on the drop down menu to bring up the contextual menu, and then click on Load Brushes. Once the Windows Explorer box opens, locate the brush “Rons Winter Collection” and press load.
- #: 22320d

- Brush size: 200px
- Opacity: 100%
- Flow: 100%


Next we would have to move and erase some parts of our roots. See image below.

- Brush size: 50px
- Hardness: 100%
- Opacity: 100%
- Flow: 100%


Step 6 - Add a flock of birds
Now to add some color or life, let’s add some birds. Create a new layer and name it “Birds” then open “Bird Brushes” from the Brush tool’s menu.
- Brush size: 100px
- Opacity: 100%
- Flow: 100%

Step 7 - Retouch the image
Now let’s enhance the overall image by changing its tones and color. Click on the “Create new fill layer or adjustment layer”.
- +13, 0, –27
- Tone Balance: Midtones
- Preserve Luminosity: Checked

- #: 443523
- Blending mode: Soft Light
- Opacity: 40%
- #: f1820b
- Blending mode: Soft Light
- Opacity: 15%

- Blending mode: Luminosity
- Opacity: 100%
- Edit: Master
- Hue: 0
- Saturation: 7
- Lightness: 5
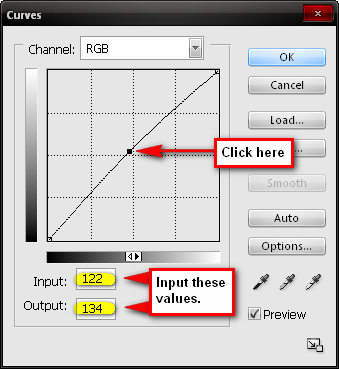
- Channel: RGB
- Input: 122
- Output: 134

- Brightness: 4
- Contrast: 10
Step 8 - Make the image look dreamy
Now let’s add a dreamy effect to our scenery. Right click on any layer then press Flatten Image. Then duplicate our image (Ctrl/Cmd + J). While the duplicated layer is selected, go to Filter > Blur > Gaussian Blur and input this value:
- Radius: 16.0

- Blending mode:
- Screen Opacity: 25%
- Colors: Blacks
- Cyan: 0
- Magenta: 0
- Yellow: 0
- Black: 5
- Method: Absolute

Now that that’s done, let’s Flatten the image.
Step 9 - Sharpening and saving as PSD
Before anything else, you may want to save it as PSD file so you may edit the image again in the future. After that, let’s sharpen the image. Go to Filter > Sharpen > Smart Sharpen and input these values:
- Amount: 125%
- Radius: 1.0
- Remove: Gaussian Blur
- More Accurate: Checked
Step 10 - Saving the file to TIFF and Jpeg
After you’ve done the sharpening, you may flatten the image by right clicking on any layer and clicking Flatten Image. You may want to save it as a TIFF file first, which would allow you to do some quick changes to the image, like adjustment layers and fill layers without reducing its quality. You can view cracks in the image through the Histogram. Finally, save it as a .jpeg image.
Note: Over edited .Jpeg files would reduce the image’s quality, especially in print.

and this is the end
from photoshoptutorials site


