This photo manipulation tutorial will give you an idea of how you can turn any photo into a catastrophe. This tutorial is good as an inspiration for ideas about how to manipulate your own photo in Photoshop.
Warzone Photo Manipulation Photoshop Tutorial
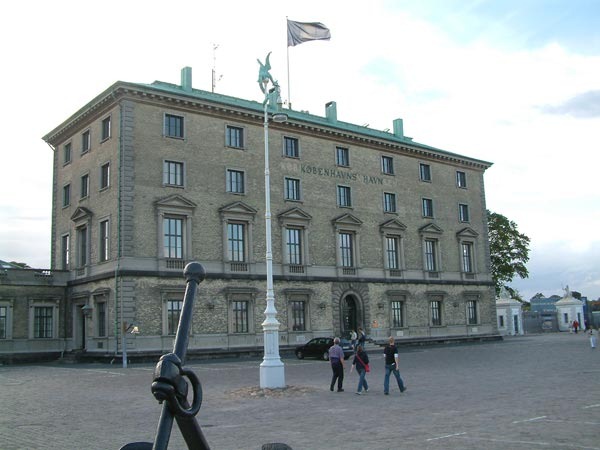
In this tutorial i will explain step by step how to turn a regular photograph in to a warzone. I used my own photograph as original, taken on my holiday in Copenhagen:
Step 1 - Duplicate the background layer.
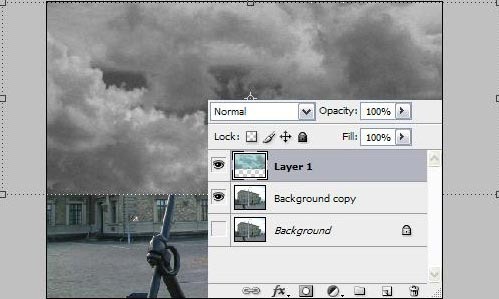
First I used a photo of clouds. Open the photo into Photoshop then then converted it to black and white with the Black and White tool (Image > Adjustments > Black and White). You can also use the Hue/Saturation or Channel mixer tool if you do not have the Black and White tool.

Step 2 – Paste the clouds picture into the main document
Choose Select > All then Edit > Copy to copy the picture of the clouds into your clipboard. Open the photo that you like to turn into a warzone then choose Edit > Paste. Select the background layer then choose Edit > Duplicate to duplicate the layer. Now we have a backup copy of the background layer.
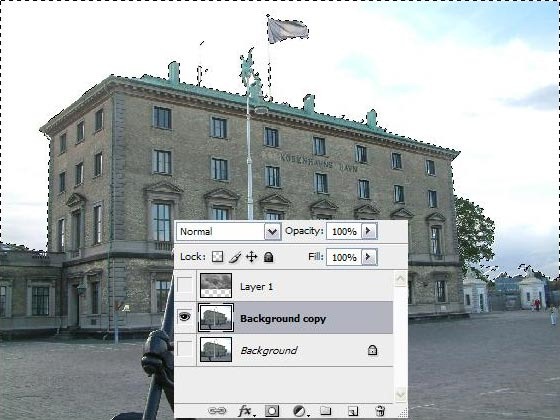
Step 3 – Remove the sky
Now we’ll remove the sky of the original image. Start by hiding the top layer with the clouds and the background layer. Use the Magic Wand tool (W) or Quick Selection tool to create a selection of the sky. Once you have the selection of the sky created, hit the delete key or choose Edit > Clear to remove it. Now move the clouds layer below the background copy layer then enable back the visibility of the clouds layer.
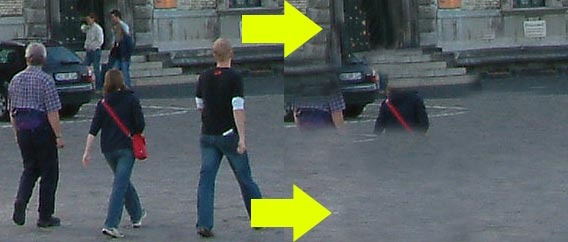
Step 4 - Clone out the people and cars
In the Background copy layer, use the Clone Stamp tool (S) to remove unnecessary objects such as people and cars. To use the Clone Stamp tool, hold the Alt key and click to pickup a pattern/texture that can be placed over the objects you will need to clone out. Then, click on the object where you like to clone and it will start to disappear. If this is your first time using the Clone Stamp tool, it may take a few tries for you to understand how it works. Below is an example of cloning in action.
Step 5 - Create a second clouds layer
To keep our layers organized, start by renaming the following:
- Rename Background Copy to Original
- Rename the layer with the clouds to Clouds
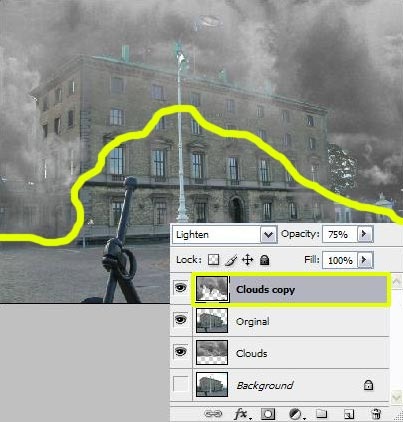
Duplicate the clouds layer then use the Transform tool (Ctrl + T or Edit > Free Transform) to resize the new clouds layer so that it fills the frame. Change the blending mode of the Clouds copy layer to 70 and set the blending mode to Lighten. Complete this step by using the Eraser tool to erase the clouds from the ground and bottom of the building like shown in the screenshot below.
Step 6 – Create another cloud layer
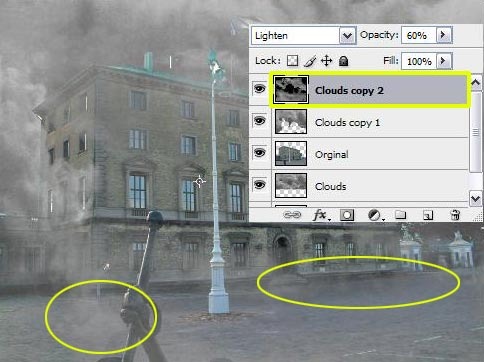
Duplicate the original clouds layer again then move it to the top in the Layers palette. Use the Free Transform tool (Ctrl+T or Edit > Free Transform) to rotate the current layer by 180 degrees and scale it up to about 200%. Set the opacity of this layer to 60% and blending mode to Lighten. Invert this layer (Ctrl+I or Image > Adjustments > Invert).
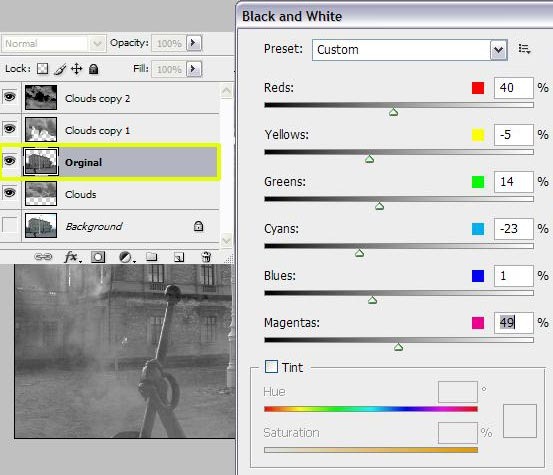
Step 7 - Black & white the Original Layer
Convert the layer Original to black and white. There are several ways to do this in Photoshop but here are a few ways you can do this:
Black and white tool (Image > Adjustments > Black and White)- Hue/Saturation (Image > Adjustments > Hue/Saturation)
- Channel Mixer (Image > Adjustments > Channel Mixer)
Step 8 - Create broken windows, cracks and fire
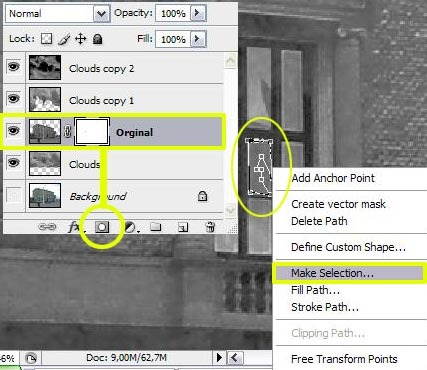
Add a layer mask to the layer Original. To do this, select the Original layer in the Layers palette then click on the 
button. Now use the Pen tool (P) to draw a crack on the window. Right click on the path then choose “Make Selection”. Press the delete key on your keyboard or choose Edit > Clear.
button. Now use the Pen tool (P) to draw a crack on the window. Right click on the path then choose “Make Selection”. Press the delete key on your keyboard or choose Edit > Clear.
Open an image of fire and copy and paste it into the current document. Position the fire under the layer Original
. I used a picture of a camp fire from my vacation photos. Name this layer Fire then erase around the fire so that you have only the fire in the layer. Convert the layer to black and white using any technique mentioned above such as using the Black and White adjustment layer. Use the Free Transform tool (Ctrl+T or Edit > Free Transform) to resize and position the fire inside the broken window.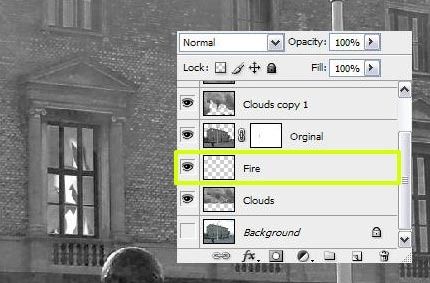
. I used a picture of a camp fire from my vacation photos. Name this layer Fire then erase around the fire so that you have only the fire in the layer. Convert the layer to black and white using any technique mentioned above such as using the Black and White adjustment layer. Use the Free Transform tool (Ctrl+T or Edit > Free Transform) to resize and position the fire inside the broken window.
Use the Polygonal Lasso tool to create a selection of the glasses in the window. Once you have the selection of the glasses in the window, press delete to remove that area. The fire from the layer below should be visible.
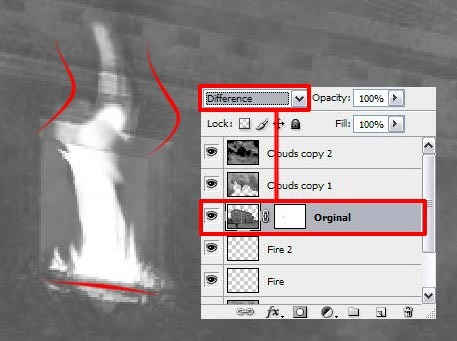
Select the layer Original then change the blending mode to Difference. Now you can see the layers below to see where you can erase. Use the Eraser tool (E) to erase parts from the top and bottom to make the fire look like it’s coming out like shown in the screenshot below. Switch the blending mode back to Normal when you’re done.
Use the Smudge Tool (R) to smudge the fire to create a hazy effect like shown in the image below. Repeat this entire step (Step 8) on the rest of the windows.
. 
Now we are going to work on the cracks. Select the Original layer then select the Lasso tool (L). Draw a figure on the wall in the shape of a hole in a wall. Press Ctrl+J to create a duplicate of that selection on a new layer. Then, right click on the new layer and choose Layer Style. Enable the Bevel and Emboss style then adjust the settings to create a bevel effect like shown below.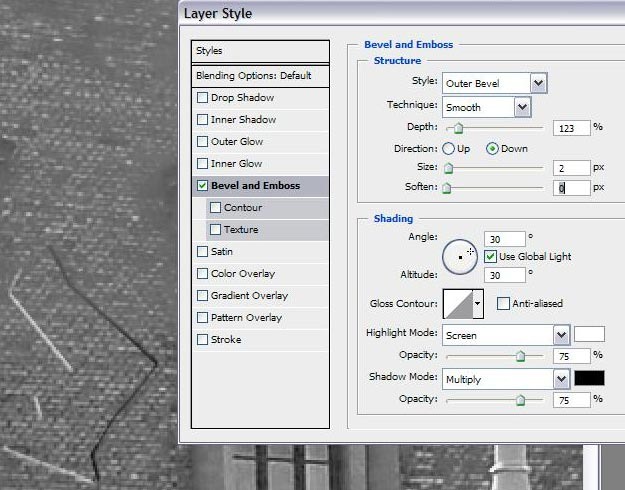 w
w
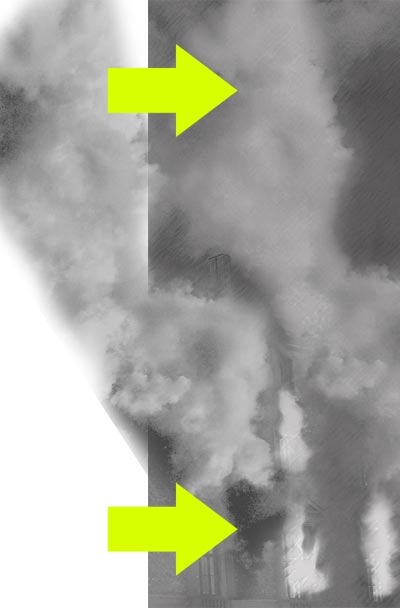
wStep 9 – Creating the smoke
Duplicate the clouds layer then name this new layer “Smoke”. Use the Free Transform tool (Ctrl+T or Edit > Transform) to rotate the layer then erase around the smoke so that it looks like smoke is coming out of the windows. Put the Smoke layer above the Fire layer(s). Use the Smudge tool to blur the edge of the smoke for a windy effect.
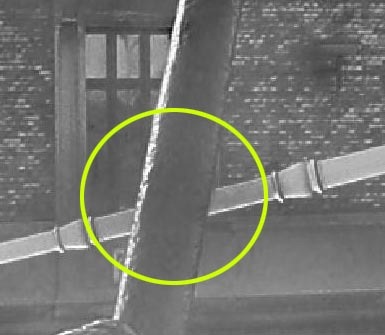
Step 10 – Lamppost
Select the layer Original then use the Lasso tool to create a selection of the lamp post. Press Ctrl+J to duplicate this selected area into its own layer. Rotate it using the Free Transform tool (Ctrl+T or Edit > Free Transform). Rotate and position the lamp post like shown in the screenshot below. Once you’re done, use the Clone Stamp tool to erase parts of the bottom of the lamp post so that it looks broken.
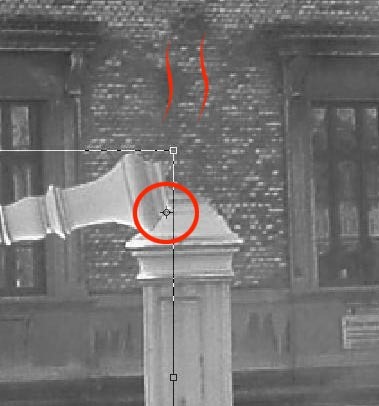
Position this lamp post layer above the layer Original. Use the Eraser tool (E) to delete the area so that it looks like it is behind the metal statue.
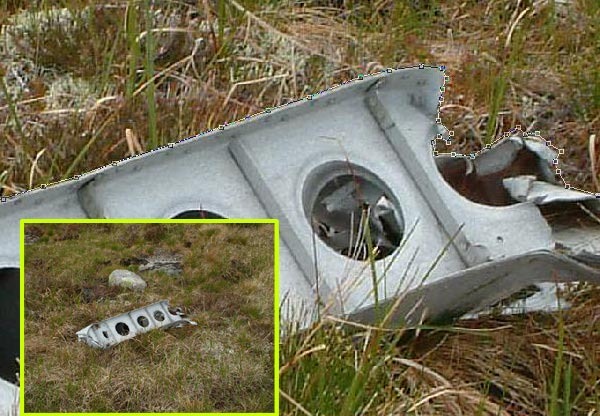
Step 11 – Plane Wreckage
On my holiday to Norway, I was hiking and found some plane wreckage. I took some photos of it and now I’ll be using it as part of this photo manipulation. Isolate the plane wreckage then paste it in our photo manipulation project.
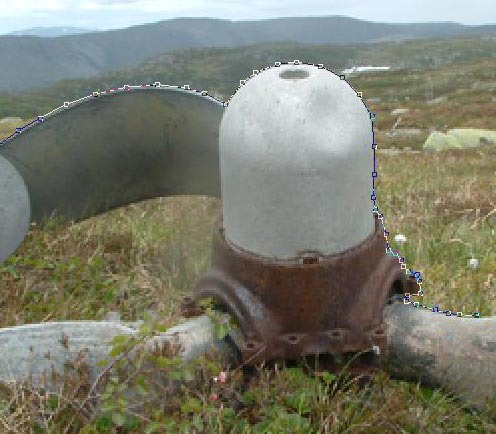
I named this layer Propeller then I positioned this layer above the layer Original
. Desaturate the layer (Ctrl+Shift+U or Image > Adjustments > Desaturate)
. Desaturate the layer (Ctrl+Shift+U or Image > Adjustments > Desaturate)
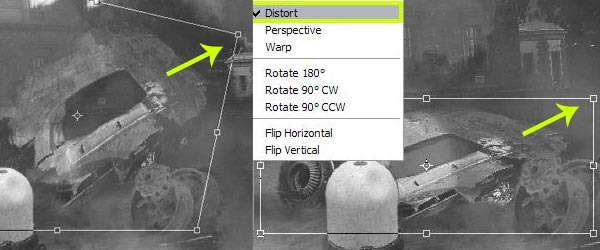
Repeat this process with other plane wreck parts. Sometimes you’ll need to use the Distort tool (Edit > Transform > Distort) to distort the object for the proper perspective.
II repeated this process with a picture of an airplane engine.
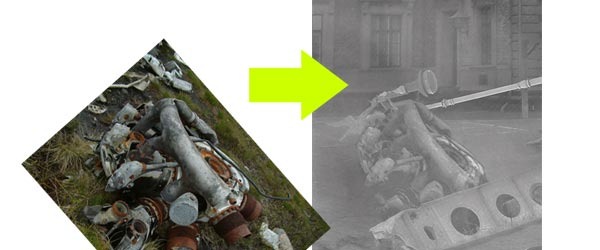
Not all the photographs where in the correct perspective so i needed to 'distort' some parts.
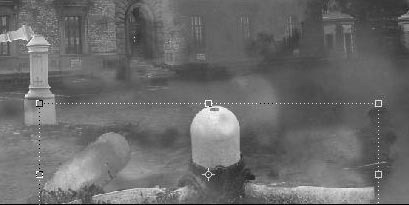
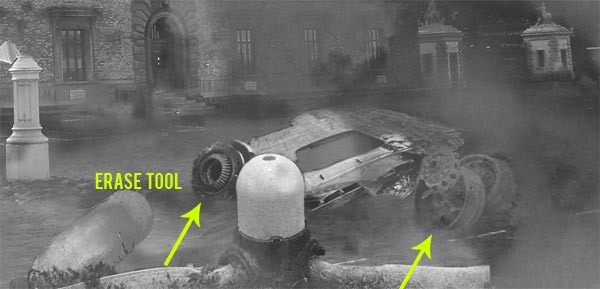
Step 12 – Additional wreckage
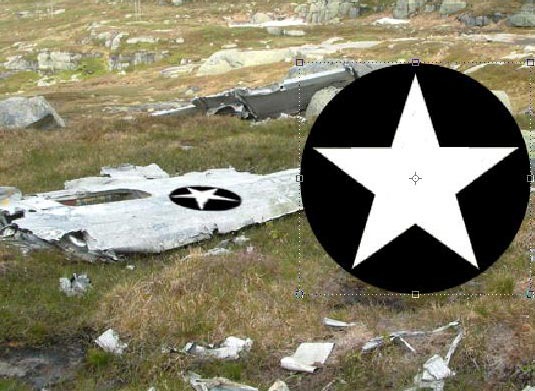
This is optional, but you can add a logo to the wings or parts of the airplane. I created this star logo and placed it on a wing using the Distort tool (Edit > Transform > Distort).
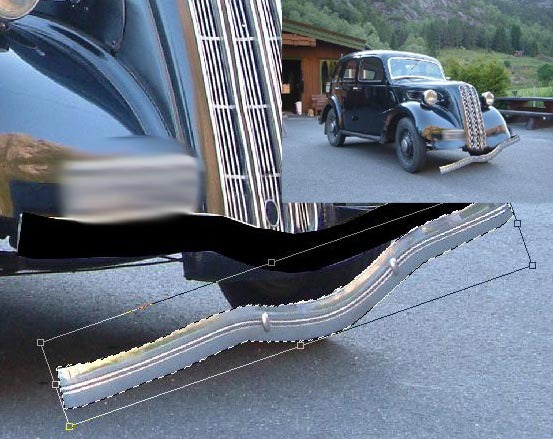
I also added a car. I made the bumper look like it was fallen off then I positioned this car in front of the building.
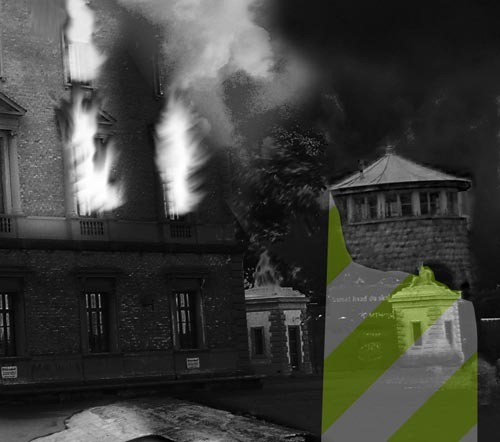
I took an image of a tower, desatureated it, and positioned it on the far right

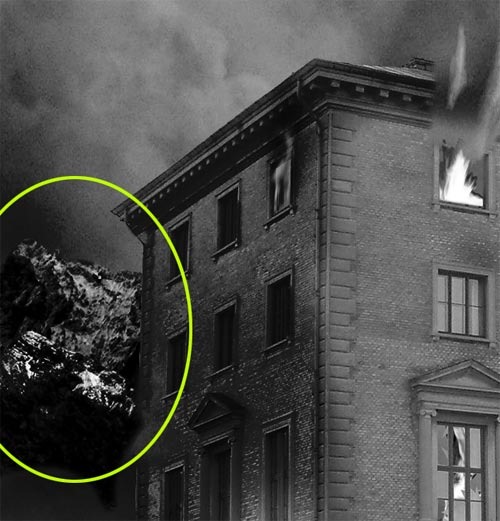
Step 13 – Adding mountains to the background
Take an image of mountains and remove the sky. Copy and paste the mountain into your project.

Position the mountain beside the building then erase the side so that it looks like it is behind the building.
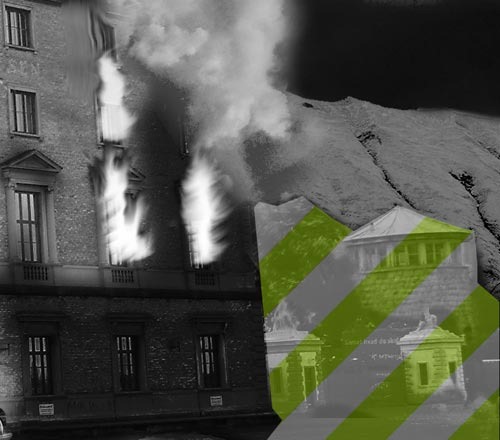
Repeat this for the other side of the building.
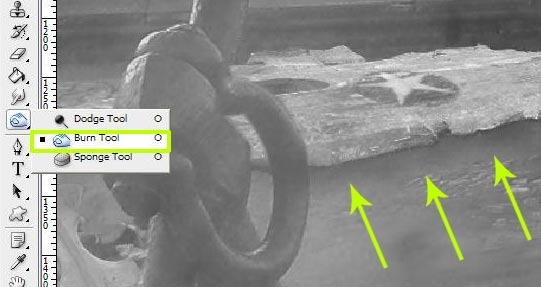
Step 14 – Finishing up
Use the Burn tool (O) to burn some area of the wreckage to give it some depth.
When you’re done, press Ctrl+Shift+J to create a new layer of the flattened contents. Make sure this layer is the top layer. Choose Filter > Brush Strokes > Angled Strokes and use the default settings. Change the opacity of the layer to 20%. You can also add other things such as adding the date, more cracks, lowering the flag, etc.
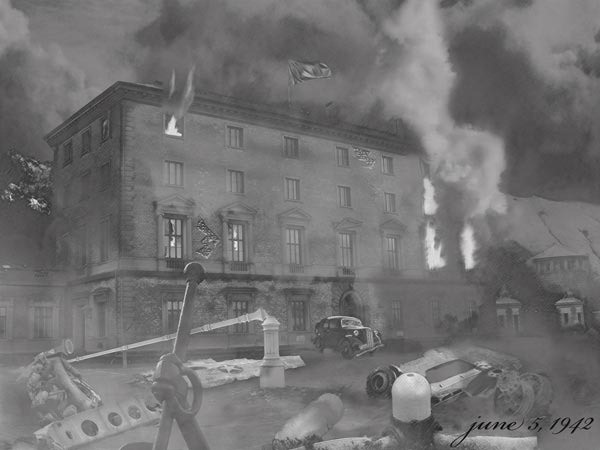
the end
moved from photoshopTutorials...

![tronlegacy[11]](http://photoshoptutorials.ws/images/stories/TRONLegacyStyle_13C61/tronlegacy.jpg "tronlegacy[11]")
![1[3]](http://photoshoptutorials.ws/images/stories/TRONLegacyStyle_13C61/13.png "1[3]")
![2[3]](http://photoshoptutorials.ws/images/stories/TRONLegacyStyle_13C61/23.png "2[3]")
![3[6]](http://photoshoptutorials.ws/images/stories/TRONLegacyStyle_13C61/36.png "3[6]")
![4[6]](http://photoshoptutorials.ws/images/stories/TRONLegacyStyle_13C61/46.png "4[6]")
![5[6]](http://photoshoptutorials.ws/images/stories/TRONLegacyStyle_13C61/56.png "5[6]")
![6[6]](http://photoshoptutorials.ws/images/stories/TRONLegacyStyle_13C61/66.png "6[6]")
![7[3]](http://photoshoptutorials.ws/images/stories/TRONLegacyStyle_13C61/73.png "7[3]")
![8[3]](http://photoshoptutorials.ws/images/stories/TRONLegacyStyle_13C61/83.png "8[3]")
![9[12]](http://photoshoptutorials.ws/images/stories/TRONLegacyStyle_13C61/912.png "9[12]")
![10[3]](http://photoshoptutorials.ws/images/stories/TRONLegacyStyle_13C61/103.png "10[3]")
![11[6]](http://photoshoptutorials.ws/images/stories/TRONLegacyStyle_13C61/116.png "11[6]")
![12[3]](http://photoshoptutorials.ws/images/stories/TRONLegacyStyle_13C61/123.png "12[3]")
![13[3]](http://photoshoptutorials.ws/images/stories/TRONLegacyStyle_13C61/133.png "13[3]")
![14[6]](http://photoshoptutorials.ws/images/stories/TRONLegacyStyle_13C61/146.png "14[6]")
![15[3]](http://photoshoptutorials.ws/images/stories/TRONLegacyStyle_13C61/153.png "15[3]")
![16[3]](http://photoshoptutorials.ws/images/stories/TRONLegacyStyle_13C61/163.png "16[3]")
![17[3]](http://photoshoptutorials.ws/images/stories/TRONLegacyStyle_13C61/173.png "17[3]")
![18[3]](http://photoshoptutorials.ws/images/stories/TRONLegacyStyle_13C61/183.png "18[3]")
![19[3]](http://photoshoptutorials.ws/images/stories/TRONLegacyStyle_13C61/193.png "19[3]")
![20[3]](http://photoshoptutorials.ws/images/stories/TRONLegacyStyle_13C61/203.png "20[3]")
![21[3]](http://photoshoptutorials.ws/images/stories/TRONLegacyStyle_13C61/213.png "21[3]")
![22[3]](http://photoshoptutorials.ws/images/stories/TRONLegacyStyle_13C61/223.png "22[3]")
![23[3]](http://photoshoptutorials.ws/images/stories/TRONLegacyStyle_13C61/233.png "23[3]")
![24[6]](http://photoshoptutorials.ws/images/stories/TRONLegacyStyle_13C61/246.png "24[6]")
![25[3]](http://photoshoptutorials.ws/images/stories/TRONLegacyStyle_13C61/253.png "25[3]")
![26[3]](http://photoshoptutorials.ws/images/stories/TRONLegacyStyle_13C61/263.png "26[3]")
![27[3]](http://photoshoptutorials.ws/images/stories/TRONLegacyStyle_13C61/273.png "27[3]")
![28[3]](http://photoshoptutorials.ws/images/stories/TRONLegacyStyle_13C61/283.png "28[3]")
![29[3]](http://photoshoptutorials.ws/images/stories/TRONLegacyStyle_13C61/293.png "29[3]")
![30[3]](http://photoshoptutorials.ws/images/stories/TRONLegacyStyle_13C61/303.png "30[3]")
![31[3]](http://photoshoptutorials.ws/images/stories/TRONLegacyStyle_13C61/313.png "31[3]")
![32[3]](http://photoshoptutorials.ws/images/stories/TRONLegacyStyle_13C61/323.png "32[3]")
![33[3]](http://photoshoptutorials.ws/images/stories/TRONLegacyStyle_13C61/333.png "33[3]")
![34[6]](http://photoshoptutorials.ws/images/stories/TRONLegacyStyle_13C61/346.png "34[6]")
![35[3]](http://photoshoptutorials.ws/images/stories/TRONLegacyStyle_13C61/353.png "35[3]")
![trontutfinal[6]](http://photoshoptutorials.ws/images/stories/TRONLegacyStyle_13C61/trontutfinal6.jpg "trontutfinal[6]")
![tronlegacy[12]](http://photoshoptutorials.ws/images/stories/TRONLegacyStyle_13C61/tronlegacy12.jpg "tronlegacy[12]")


